
Table of Contents
- Why Coop Moisture Matters for Your Flock
- Diagnosing Moisture Sources in Your Chicken Coop
- Improving Chicken Coop Ventilation to Release Moisture
- Best Bedding for a Chicken Coop: Natural Absorbent Materials
- How to Dry Out a Wet Chicken Coop: Practical Steps
- Zeolite for Chicken Coop Moisture: A Natural Solution
- Seasonal Moisture Control: Winter, Spring, Summer, and Fall
- Frequently Asked Questions
Last Updated: October 6, 2026
Why Coop Moisture Matters for Your Flock
Excess moisture in a chicken coop creates an environment where ammonia builds up, respiratory problems develop, and parasites thrive. When you reduce coop moisture naturally, you protect your birds' health and improve egg quality.

At Arden Line, we understand that backyard chicken keepers need practical solutions that work without chemicals or complicated equipment. Moisture control isn't just about comfort, it's about flock health.
The good news: you can reduce coop moisture naturally through ventilation, bedding management, and strategic moisture removal. These methods cost little and require only basic maintenance. Most backyard keepers see improvement within days of implementing these steps.
Diagnosing Moisture Sources in Your Chicken Coop
Before you can fix a moisture problem, you need to identify where the dampness originates. Different sources require different solutions.
Common moisture sources in chicken coops:
- Chicken droppings (chickens produce wet waste)
- Spilled water from drinkers
- Condensation on walls and roof
- Standing water outside the coop
- Rainwater leaking through roof or walls
- Ground moisture seeping up from the floor
- Wet bedding that hasn't been changed
Start by checking these spots:
- Feel the bedding, is it damp or soggy?
- Look for water pooling on the floor or outside the coop
- Check the walls and roof for condensation, especially in corners
- Inspect for leaks after rain
- Feel the air inside, does it feel heavy or humid?
On humid mornings, condensation often forms on the coldest surfaces. This is a sign your coop lacks proper airflow. You'll notice it most on metal roofs and north-facing walls. If you see condensation regularly, ventilation is your priority.
Improving Chicken Coop Ventilation to Release Moisture
Ventilation is the single most effective way to reduce coop moisture naturally. Moving air removes moisture-heavy air and replaces it with fresh, dry air. Without airflow, moisture accumulates and creates the damp conditions that harm your flock.
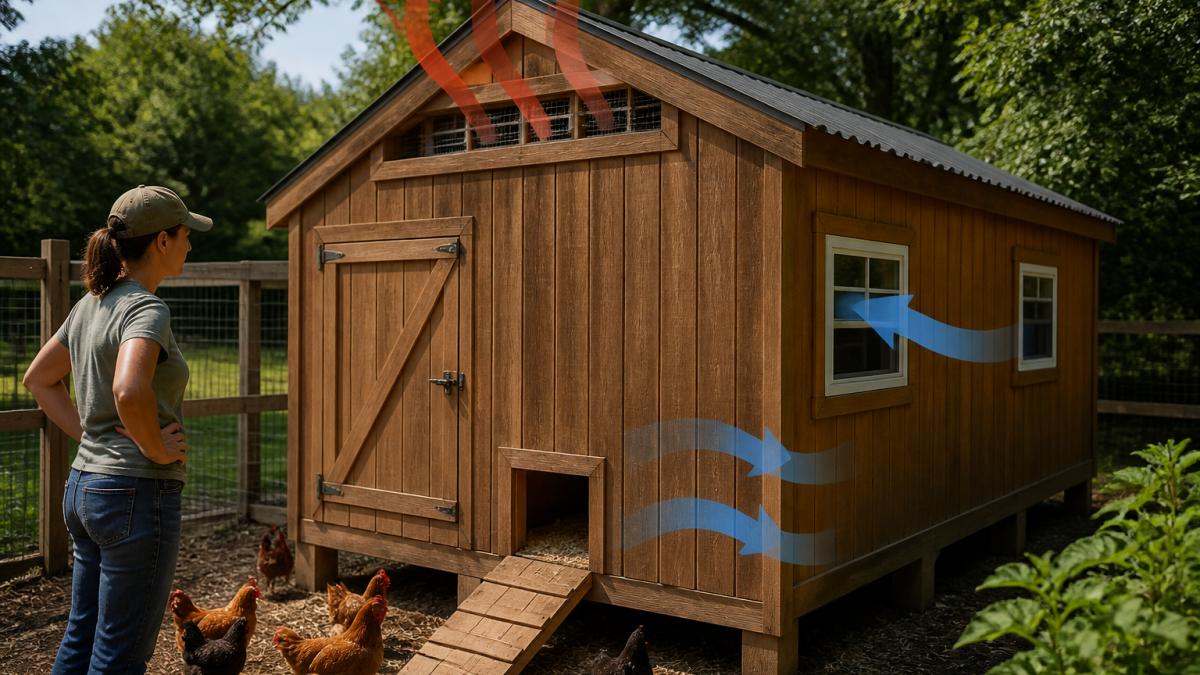
The key principle: warm, moist air rises. Your ventilation design should allow this air to escape through high vents while fresh air enters through lower openings. This creates cross-airflow that continuously removes moisture.
Why ventilation matters for moisture control:
- Removes ammonia gas from bedding
- Prevents condensation buildup
- Keeps bedding drier between cleanings
- Reduces bacterial growth
- Improves respiratory health for chickens
Install High Vents and Gable Vents
High vents work because warm air naturally rises. Install vents near the roof or at the top of walls to allow moist air to escape. These should be positioned opposite each other if possible, creating a path for air to flow through the coop.
How to install high vents:
- Choose locations near the roof peak on opposite sides of the coop
- Cut openings (6-12 inches square works for small backyard coops)
- Cover openings with hardware cloth to prevent predators from entering
- Ensure vents stay open year-round, don't seal them in winter
- Position vents above roosting areas where moisture concentrates
Gable vents at the peak of your roof work especially well because they sit at the highest point. Warm, moisture-heavy air naturally flows upward and exits through these vents. Even small gable vents (8 inches square) make a measurable difference in moisture removal.
Add Windows and Soffits for Cross-Airflow
Windows provide both light and ventilation. Opening windows creates cross-airflow when combined with high vents. Position windows on the opposite side of the coop from your high vents to establish a clear airflow path.
Soffits (vents under the eaves) allow fresh air to enter low while moist air exits high. This creates the ideal ventilation pattern for moisture removal.
Setting up cross-airflow:
- Install low vents or soffits on one side
- Install high vents or gable vents on the opposite side
- Ensure nothing blocks the air path (no large roosts or feeders in the way)
- Keep vents clear of bedding and debris
Best Bedding for a Chicken Coop: Natural Absorbent Materials
The bedding you choose directly affects how much moisture your coop retains. Some materials absorb water quickly; others stay damp for days. Natural, absorbent bedding is your first line of defense against moisture buildup.
Bedding materials ranked by absorbency:
- Pine shavings (excellent absorbency, stays dry longer)
- Aspen shavings (good absorbency, softer than pine)
- Sand (drains well but doesn't absorb moisture)
- Straw (poor absorbency, holds moisture)
- Hay (poor absorbency, promotes mold)
- Leaves (moderate absorbency, breaks down quickly)
Pine shavings absorb moisture better than most alternatives. They also control ammonia naturally, which helps reduce odor as bedding breaks down. Avoid hay and straw, these materials trap moisture and create conditions where ammonia builds up quickly.
Deep Litter Method vs. Regular Bedding Changes
The deep litter method involves adding fresh bedding on top of old bedding without removing the bottom layer. Over time, beneficial microbes in the lower layers break down waste and generate heat. This method works well in coops with excellent ventilation but can trap moisture in poorly ventilated spaces.
Deep litter method:
- Add 4-6 inches of fresh bedding initially
- Add 2-3 inches of fresh bedding weekly
- Replace completely every 6-12 months
- Works best with pine shavings
- Requires good ventilation to prevent moisture accumulation
- Generates natural heat in cold months
Regular bedding changes (every 1-2 weeks):
- Remove all old bedding
- Add 4-6 inches of fresh bedding
- Better moisture control in humid climates
- Requires more frequent work
- Best for coops with moisture problems
- Prevents ammonia buildup in small spaces
For reducing coop moisture naturally, regular bedding changes work better than the deep litter method. Fresh bedding absorbs moisture immediately. Old, saturated bedding holds moisture and creates ammonia-rich conditions.
How to Dry Out a Wet Chicken Coop: Practical Steps
When your coop is already damp, you need immediate action to dry it out and prevent further moisture accumulation. This step-by-step process addresses both the moisture and its sources.
Your 5-step moisture removal plan:
- Remove all wet bedding
- Inspect and repair leaks
- Improve ventilation
- Add fresh, dry bedding
- Maintain daily moisture checks
Remove Wet and Contaminated Bedding
Wet bedding is the primary source of ammonia and continued moisture. Removing it immediately stops these problems from worsening. Don't just add fresh bedding on top, this traps the damp material underneath.
How to remove wet bedding:
- Clear the entire coop floor down to bare ground or wood
- Dispose of old bedding in compost or yard waste
- Sweep the floor to remove remaining debris
- Allow the floor to air dry for a few hours if possible
- Add 4-6 inches of fresh, dry pine shavings
After removing wet bedding, the ammonia smell usually improves within hours. Your chickens will also show less stress, they prefer dry conditions and fresh air just as much as you do.
Prevent Standing Water and Manage Leaks
Standing water outside the coop seeps in through cracks and gaps, creating ongoing moisture problems. Check the ground around your coop after rain. If water pools near the coop, you've found a major moisture source.
Preventing standing water:
- Grade soil to slope away from the coop
- Add drainage channels around the coop perimeter
- Use gravel or mulch to improve drainage
- Move waterers away from the coop if they spill frequently
- Inspect the roof and walls for leaks after rain
- Patch holes with caulk or roofing material
- Ensure gutters direct water away from the coop
Small leaks become big problems in damp coops. A roof leak that drips into bedding creates a moisture hotspot. Check your coop carefully during or after rain.
Zeolite for Chicken Coop Moisture: A Natural Solution
Natural mineral additives like zeolite work alongside your ventilation and bedding changes. Zeolite is a porous volcanic mineral that traps ammonia and absorbs moisture.
Zeolite works by adsorbing ammonia gas and water molecules into its porous structure. This keeps bedding drier and reduces ammonia odor.
How zeolite helps reduce coop moisture:
- Absorbs excess moisture from bedding
- Traps ammonia gas at the source
- Keeps bedding fresher between changes
- Supports respiratory health by reducing ammonia
- Works best combined with ventilation improvements
Arden Line's Chicken Coop Deodorizer uses 100% natural volcanic zeolite to control moisture and ammonia. Sprinkle it over bedding and in nest boxes. Reapply weekly or when bedding starts to feel damp.
Zeolite is most effective when combined with good ventilation and regular bedding changes. Think of it as a support tool, not a complete solution.
Seasonal Moisture Control: Winter, Spring, Summer, and Fall
Moisture problems change with the seasons. Each season presents different challenges for keeping your coop dry. Adjust your approach based on what's happening outside.
Winter moisture control:
- Condensation becomes the main problem as warm air meets cold roof
- Keep high vents open even in freezing weather
- Add extra bedding for insulation, but change it more frequently
- Monitor for ice dams that trap water
- Ensure ventilation prevents moisture from freezing on walls
Spring moisture control:
- Rain increases standing water around the coop
- Improve drainage and grade soil away from the coop
- Check for leaks that winter may have created
- Increase bedding changes as rain adds moisture
- Ventilation remains important as air warms
Summer moisture control:
- High humidity makes moisture control harder
- Maximize ventilation by opening all windows and vents
- Change bedding more frequently in humid climates
- Ensure waterers don't spill on bedding
- Consider additional ventilation fans if humidity stays high
Fall moisture control:
- Prepare for winter by improving insulation and ventilation
- Check roof and walls for damage before cold weather
- Clear gutters to prevent water backup
- Establish a winter maintenance routine
- Test ventilation before temperatures drop
The key: adjust your moisture management strategy with the seasons. What works in summer won't work in winter. What works in spring won't work in fall.
Excess moisture in your chicken coop creates health risks that compound over time. Reduce coop moisture naturally through ventilation, bedding management, and moisture removal. Start with improved airflow and fresh pine shavings, these two changes solve most moisture problems.
Frequently Asked Questions
Can zeolite help control moisture and odor in a chicken coop?
Yes. Zeolite is a naturally porous mineral that traps ammonia gas and excess moisture at the source, rather than masking odors with fragrance. When sprinkled over bedding, nest boxes, and coop floors, it absorbs moisture and ammonia that cause coop smell and damp conditions. Arden Line's Chicken Coop Deodorizer uses 100% pure zeolite with no chemicals or fragrances, making it safe for daily use around your flock.
How often should I replace damp bedding in a chicken coop?
Replace visibly wet or heavily contaminated bedding immediately, don't wait. For routine maintenance, refresh bedding weekly or more often in high-moisture climates. Wet bedding promotes ammonia buildup and respiratory issues. If you use the deep litter method, monitor for dampness and add fresh absorbent material (pine shavings, wood pellets) weekly. In winter or humid seasons, check bedding more frequently since ventilation and evaporation slow down.
Which chicken coop bedding absorbs moisture best?
Pine shavings, wood pellets, and sand are among the most absorbent options. Pine shavings are popular because they're affordable and dry quickly. Wood pellets (kiln-dried) absorb moisture rapidly. Sand drains moisture away but requires more frequent raking. Avoid cedar and hay; cedar is toxic to chickens and hay retains moisture. Combine your chosen bedding with zeolite to boost moisture absorption and ammonia control.
How can I tell whether condensation in my coop is a ventilation problem?
Check for visible water droplets on the inside roof, walls, or nesting boxes, especially on cool mornings. If condensation appears only in winter or after heavy rain, ventilation is likely your main issue. Look for moisture-heavy air that doesn't escape, high vents and gable vents release warm, humid air. If condensation persists even with good airflow, your bedding may be too wet or your coop is overcrowded. Measure humidity with an inexpensive hygrometer; healthy coop humidity is 40-60%.



Leave a comment
This site is protected by hCaptcha and the hCaptcha Privacy Policy and Terms of Service apply.